|
The Calibrate files dialog box provides image calibration operations allowing to create master images and calibration groups, and to calibrate files using calibration groups. It is organized into three tabs: Master image creation, Calibration group selection, and Calibrate files, each of which is detailed in the following sections.
Master images creation
The Master image creation tab is used to combine multiple individual calibration images of the same type (e.g., multiple bias frames) into a single master frame. It consists of two sections: Type and Selected files.

- To begin, you need to specify the Type of master calibration frame you want to create, choosing from Master Bias, Master Dark or Master Flat.
- Next, use the Add files button to select the individual calibration files corresponding to the choosen Type. These files will be displayed in the Selected files list and will be combined to create the master calibration frame. In the example above, select individual Bias frames. If necessary, you can remove entries from the list using the Remove from list button or Clear the entire list to restart.
- Once all individual calibration files have been chosen, select the desired Combination method. This method dictates how the individual calibration files will be combined, offering the choice between Average, Median or Sigma clipping. Refer to the Image math section for a more detailed explanation of these methods. Median is recommended.
- Clicking the Create Master image button will display the generated master image, which then can be saved to file. Throughout the creation process, Phoranso will perform compatibility tests to ensure that all images in the Selected files list possess identical dimensions, binning, filter, etc.
- To create a (normalized) Master Flat image, you'll need two additional input files: a Master Bias frame and a Master Dark frame.
How to select the right Master Dark frame in this step? To answer this question, let's delve into the underlying process behind the creation of a Master Flat image. Phoranso initially subtracts the Master Bias frame from each Flat frame in the Selected files list, creating an "intermediate" Flat frame. Next, it scales the Master Dark frame you provided to match the exposure time of the intermediate Flat frame. Subsequently, the scaled Master Dark frame is subtracted from the intermediate Flat frame. Finally, the resultant frame is normalized, and all normalized flat frames then are combined to produce the Master Flat image.
Given this process, we recommend to select a Master Dark frame with an exposure time that closely matches the exposure time of the Flat frames in the Selected files list.
Calibration group selection
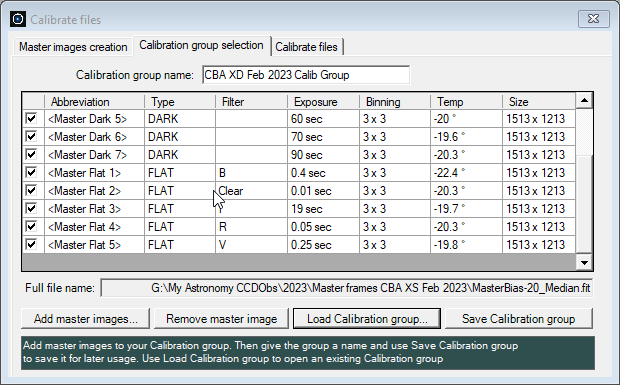
Phoranso allows to logically group master bias, dark and flat frames through designated Calibration Groups. Each Calibration Group comprises one or more master bias frames, one or more master dark frames and one or more master flat frames, all managed within the Calibration group selection tab.
Example: if you operate from two distinct observatories, you can create separate Calibration groups. One group can ecompass all relevant master frames for your first observatory, while a second group contains the master files for your other observatory.
It's not uncommon to encounter scenarios where a single Calibration group houses a dozen or more master dark frames, each with varying temperatures and exposure times. For example, you might have a master_dark_30sec_min15, derived from combining several individual dark frames, all captured with a 30-second exposure time and at a sensor temperature of -15°C. Another variant could be a master_dark_30sec_min20, formed by combining dark frames with a 30-second exposure time but taken at a temperature of -20°C.
Similarly, a Calibration group often comprises numerous master flat frames, each tailored to a specific filter and temperature combination. For instance, you might possess a master_flat_V_min15 and a master_flat_V_min20.

The Calibration group selection tab functions as follows:
- Click the Add master images button to initiate the addition of master bias, dark and flat images. These images will be displayed in a grid table, showcasing the file Type (BIAS, DARK, FLAT), the used Filter, Exposure time, Binning, Temperature and image Size.
- To remove one or more master images from the table, select them and click the Remove master image button.
- In the first column, select the master images that you want to include in a Calibration group. To select or deselect all of them, click the empty header field left of the Abbreviation header field.
- Enter a name for your Calibration group in the Calibration group name text box. This name serves as a reference for the Calibration group in the Photometry dialog box or the Calibrate files tab (see section below).
- Finally, click the Save Calibration group button to save the Calibration group. Similarly, use the Load Calibration group button to retrieve the contents of a previously saved Calibration group.
Calibrate files
Phoranso provides two methods for calibrating Science images:
- Stand-alone operation: utilize the Calibrate files tab, as detailed below. This approach enables you to (later on) perform photometry from already calibrated images.
- Fully integrated: alternatively, calibration can be seamlessly integrated within the Photometry box, streamlining the workflow for a more cohesive and efficient process.

The Calibrate files tab functions as follows:
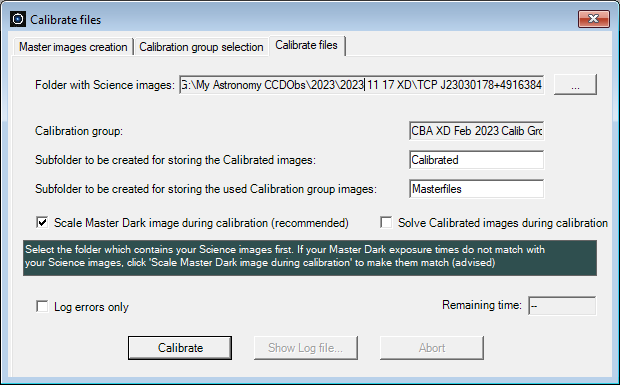
- Use the button with the 3 dots ... to select the folder containing the Science images to be calibrated. The selected folder will be displayed in the Folder with Science images field.
- The name of the Calibration group (containing master bias, dark and flat images) for calibrating the Science images is automatically preselected. This preselection corresponds to the group loaded in the Calibration group selection tab.
- Enter the name of the subfolder where Phoranso will store the Calibrated images. The default value is Calibrated. Refer to the recommended Phoranso folder structure section for more details.
- Enter the name of the subfolder where Phoranso will store the masterfiles used for calibration. These files are extracted from the Calibration group.
- Click the Calibrate button to initiate the calibration process for the Science images. Once launched, use the Show Log file button to reveal a logging window for monitoring the calibration progress. The Remaining time field provides an estimate of the time required to complete calibration for all Science images.
- Use the Abort button to interrupt the calibration at any point. Clicking Calibrate again will resume calibration without re-processing already calibrated images.
- Additional fields:
- To use a master dark frame during calibration, it must have the exact exposure time as the Science image. Select the Scale Master Dark image during calibration (recommended) option to instruct Phoranso to search for a master dark image in the Calibration group with a sufficiently long exposure time that can be 'scaled' to match the Science image's exposure time.
- Opt for Solve Calibrated images during calibration to also solve calibrated Science images. This solving information will be reused during later Photometry calculations.
- Choose Log errors only to limit the contents of the logging window to error messages encountered during calibration.
|


